So, in case you are also getting frustrated with this annoying error and stuck on the automatic repair loop in Windows 11 PC. Then, there are a few kinds of solutions that we can propose. But, just as with every other problem that we are supposed to fix, let’s figure out which could be the root causes due to which this type of issue occurs. So, let’s start with the guide.
What Are The Causes of Automatic Repair Loop?
However, since we can recognize the root cause or the potential originators of this kind of behaviour. Therefore, let’s start with the troubleshooting guide and see one of the most common troubleshooting techniques that help you fix automatic repair loop issues in Windows 11 PC.
What Are The Causes of Automatic Repair Loop?Methods to Fix The Automatic Repair Loop in Windows 11#1. Disable Antivirus Protection#2. Delete Problematic Files#3. Try to Rebuild BCD#4. Disable Automatic Startup Repair#5. Restore Windows Registry#6. Hard Boot Windows#7. Reset Your Windows 11 PCFrom Editor’s Desk
Also Read- Windows 11 Installation Stuck? Here’s How to Fix
Methods to Fix The Automatic Repair Loop in Windows 11
You can use various methods to fix this issue, but here we have only mentioned those fixes that our team has tested before. So, you can rely on these methods as these will not harm your PC.
#1. Disable Antivirus Protection
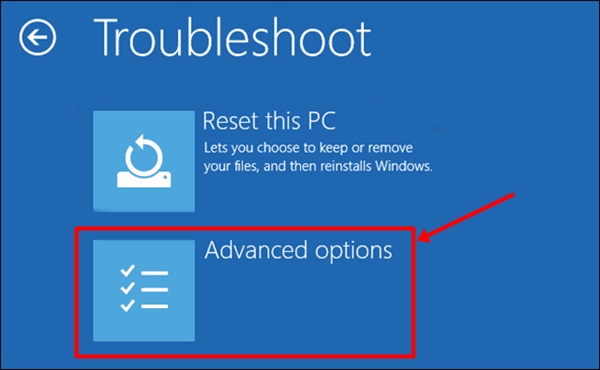
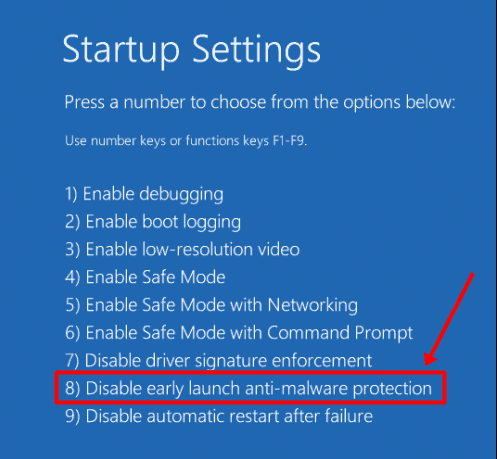
Most of the time, the antivirus causes this kind of issue. So, in my opinion, disabling it will be the right option for you. However, in case you are not familiar with the steps that let you disable it, follow the guidelines we have mentioned below:
#2. Delete Problematic Files
Sometimes, the files that become inexecutable might become the main culprit to this kind of error. So, in case that deleting them will be the right option for you. Therefore, to delete them, you need to follow the steps we have mentioned below:
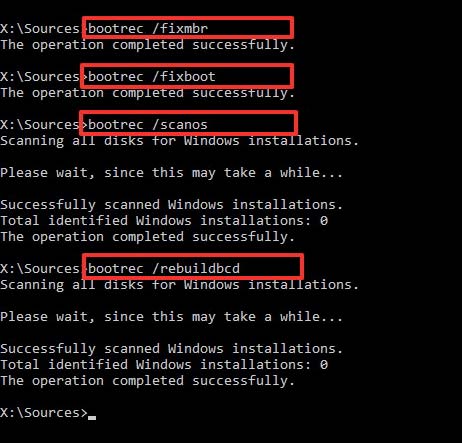
#3. Try to Rebuild BCD
Many users previously reported that rebuilding the BCD and gave positive reports regarding fixing this issue. So, we recommend you try this once by following the given steps:
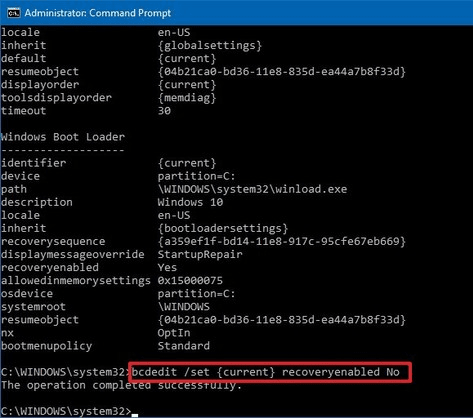
#4. Disable Automatic Startup Repair
If this feature is enabled on your Windows 11 PC, we recommend you disable this option as it is not always helpful and doesn’t always fix booting issues. So, disabling this option will be the right choice for you.
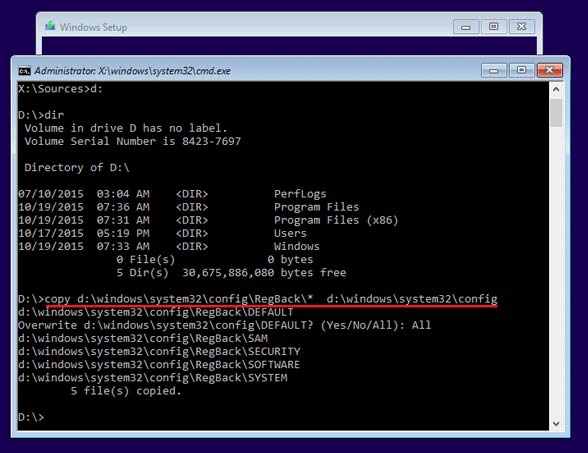
#5. Restore Windows Registry
You can also try restoring the Windows Registry, using the Command Prompt. So, here are the steps that you need to follow:
#6. Hard Boot Windows
Did you try this before? If not, then we highly suggest you try this out, and it will surely help you fix the Automatic Repair Loop. Anyway, here are the necessary steps that you need to use in order to hard boot your Windows 11 PC:
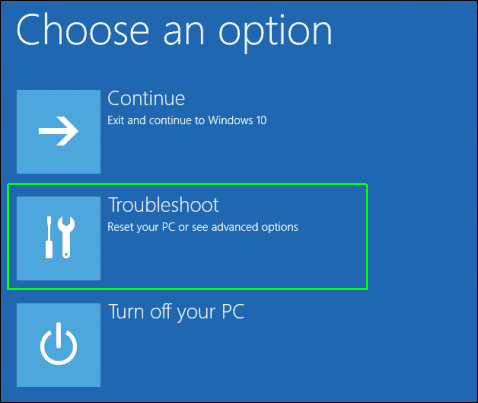
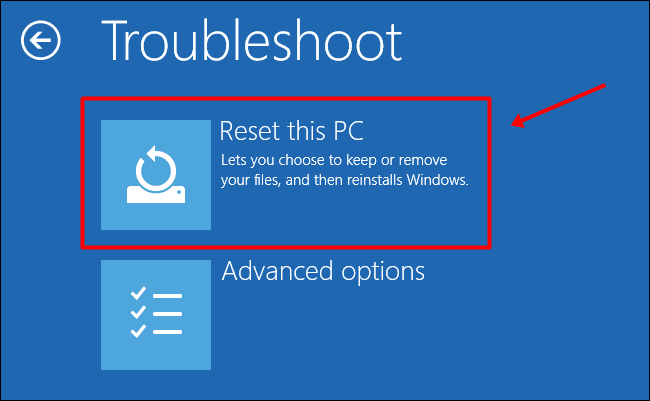
#7. Reset Your Windows 11 PC
So, even after trying different methods, you’ve noticed that the issue still persists. So then, we recommend you to once reset your Windows 11 PC, and to do so, follow these steps:
From Editor’s Desk
So, these are some methods that you can use to fix the Automatic Repair Loop in Windows 11. We hope you find these fixes helpful. However, if you still find any difficulty fixing this issue, let us know in the comment section.